Acrylic is a versatile material used in a wide range of sectors, from utilitarian household products to art installations, and is noted for its resilience and clear-as-glass appearance. Acrylic has a sleek appearance, but after being cut or molded, it frequently has jagged or rough edges. Here is where the skill and methodology of polishing acrylic edges are put to use. By reducing sharp edges, polishing not only makes the acrylic piece more attractive but also makes it safer.
Why is it crucial to polish acrylic edges?
The edges of a cut acrylic sheet might be either crisp or rough. These edges not only have the potential to detract from the acrylic piece’s aesthetic attractiveness, but they may also be dangerous. These edges can be polished to create a polished appearance while also making the acrylic’s edges safe for human contact.
Best Ways to Cut Acrylic
Before you cut your acrylic sheet, just have a look at the thickness of your material. Think about how precise you need the cuts to be. Here are some of the common methods used to cut acrylic:
1.Score and Snap Method (for thin acrylic sheets)
This is the easiest and most accessible technique. It is best applied on acrylic sheets up to about 1/4 inch (6 mm) thickness. For this, you have to score the acrylic along a straight line and then break it cleanly along that score.
Steps:
- Place a ruler or straight edge along the line of the cut, holding that as a guide to work with a utility knife or acrylic cutter.
- Score the acrylic multiple times along the same line. Apply firm pressure to create a deep groove.
- Once sufficiently scored, position the acrylic on the edge of a table with the scored line aligned with the edge.
- Press down firmly on the overhanging side to snap the acrylic along the score line.
This method works well for straight, simple cuts on thinner sheets.
2.Table Saw (for thicker acrylic sheets)
If you have thick acrylic sheets (greater than 1/4 inch), it is best to use a table saw (fine blade). The table saw is also good at making long, straight cuts. It provides clean, smooth edges and can handle larger pieces of material.
Steps:
- Use a fine-tooth blade specifically designed for cutting acrylic or plastics (a triple-chip grind blade is ideal).
- Secure the acrylic sheet firmly on the table.
- Adjust the saw blade such that it barely protrudes above the surface of the acrylic.
- Move the acrylic into the saw in a slow and steady manner to prevent chipping or melting.
This method offers precise, professional-looking cuts, especially for large sheets of acrylic.
3.Laser Cutting (for intricate shapes and precision cuts)
Laser cutting is the most accurate and effective technique for cutting acrylic. It is especially apt when intricate shapes, designs, or highly detailed cuts are required. This type of cutting is often used in professional setups or by enthusiasts who have access to laser cutting equipment.
Steps:
- Utilize a CO2 laser cutter that works with acrylic material.
- Adjust the power and speed settings accordingly with the acrylic’s thickness.
- Input the design or shape into the machine’s software for programming.
- Enable the machine to smoothly cut through the acrylic, producing polished edges without requiring extra finishing touches.
Laser cutting is perfect for precise tasks, but it needs specific tools.
What are the Methods to Polish Acrylic Edges
1.The Sanding Method for Polishing Acrylic Edges
Sanding is generally the initial process in getting acrylic edges ready for polishing. It is a slow process that gradually refines the uneven edges and sets the foundation for the ultimate shine. Initially, a rough grit sandpaper, typically around 120 or 180, is employed. It can remove significant flaws or inconsistencies on the edge. The rougher grit smooths out the surface but it also leaves behind visible scratches. The reduction is achieved by steadily progressing to finer sandpaper grits.
In grits, go up to, for example, 400 and then up to 600 to smoothen further. Always sand in one direction for evenness in the finish. You can do back and forth or side to side. Adding water or a lubricant to the acrylic when sanding prevents it from overheating. It reduces the risk of causing additional damage.
After sanding, the edges of the acrylic may have a frosted or matte appearance. This cloudy look is normal, and further steps in the process of polishing acrylic edges will restore clarity.
Steps
- Firstly, remove the big imperfections by starting with coarse grit sandpaper (120 or 180).
- Sand in one consistent direction (back and forth or side to side).
- Gradually move to finer sandpapers (400, then 600 grit).
- Use water or a lubricant while sanding to prevent overheating.
Sand until the edges are smooth, even if they appear frosted.
2.Buffing Wheels for Polishing Acrylic Edges
With polishing with a buffing wheel and polishing compound, the acrylic goes through its final and most important step of obtaining a shiny, glassy appearance. The polishing wheel is mostly made of soft raw materials like cotton or muslin. It rotates rapidly to give acrylic its shiny look. The polishing compound is made specifically for acrylic or plastics. It is used on the wheel to help smooth the surface of the acrylic and improve its clarity.
When polishing acrylic edges, it is crucial to treat the acrylic with care. There should be controlled friction to prevent the edges from melting. The goal is to lightly press the edge of the acrylic against the wheel. You must move it evenly to ensure uniform polishing. The buffing wheel must also be clean for polishing acrylic edges—any debris or contaminants can easily scratch the acrylic during the process. Buffing produces a clear, glossy edge when done correctly, eliminating the frosted appearance left behind by sanding.
Steps
- Apply acrylic-specific polishing compound to a soft buffing wheel (cotton or muslin).
- Gently press the acrylic edge against the wheel.
- Move the acrylic evenly across the wheel for consistent polishing.
- Ensure the buffing wheel is clean to avoid scratches.
- Continue buffing until the edge is clear and glossy.
3.Flame Polishing Acrylic Edges
Flame polishing acrylic edges is an advanced technique that uses a hydrogen-oxygen torch to pass a focused, fine blue flame over the acrylic edges. This process momentarily heats the surface, causing the acrylic to melt just enough to smooth out any remaining imperfections, scratches, or roughness from previous steps. As the molten surface cools, it becomes glossy and polished, giving the acrylic a sharp, clean finish.
Success in flame polishing relies on being able to maintain both speed and control. One should avoid overheating, and to do that, move the flame quickly and consistently along the edge. If the heat on the acrylic becomes excessive, it may become distorted or form bubbles and damage the surface. Skill is required to manage the torch, and expertise results in a smooth, shiny edge with few flaws.
Flame polishing is perfect for acrylic pieces with straight edges, but it takes practice to become proficient. It is advisable to flame polish acrylic edges carefully, since applying excessive heat can harm the acrylic material.
Steps
- With a hydrogen-oxygen torch, create a fine blue flame.
- Pass the flame quickly and evenly over the acrylic edge.
- Allow the surface to momentarily melt and smooth out imperfections.
- Avoid overheating to prevent warping or bubbles.
- Let the molten surface cool for a sharp, polished finish.
Safety Precautions for polishing Acrylic Edges
Following safety procedures is necessary when polishing acrylic edges:
- To protect your eyes from flame or acrylic shavings, always wear safety goggles.
- Make sure the area where you are flame polishing is free of anything flammable.
- Wear gloves to shield your hands from burns and sharp acrylic edges.
- To disperse vapors, make sure there is adequate ventilation, especially if you’re utilizing chemicals or flame polishing.
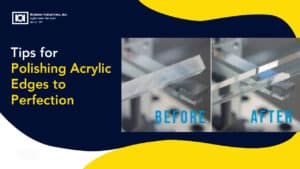
Tips for Polishing Acrylic Edges to Perfection
- Clean the acrylic item to ensure that any dust or other contaminants are eliminated before beginning the polishing procedure.
- Make sure your equipment is clean and clear of debris, especially polishing wheels.
- When sanding, make sure to move progressively from coarse to fine-grit sandpaper and to always sand in one direction.
- – Be careful not to overpress when buffing or flame polishing because too much pressure or heat can harm the acrylic.
- – Always clean the acrylic item after polishing to get rid of any polishing compound residue.
Conclusion
The art of polishing acrylic edges combines skill and accuracy. Whether you’re a DIY enthusiast or a skilled craftsperson, knowing the procedures and subtleties can significantly affect how your acrylic work turns out. It not only improves the piece’s aesthetic appeal but also makes sure that it is safe to handle. You may become an expert at polishing acrylic edges with the correct equipment, methods, and safety precautions, giving each acrylic creation its best possible sheen.
Frequently Asked Question (FAQS)
1. What is the best method to polish acrylic edges for beginners?
For beginners, sanding followed by buffing is the most manageable and effective method. Start with coarse-grit sandpaper (120–180), move to finer grits, and finish with a buffing wheel for a glossy finish.
2. Can flame polishing acrylic edges replace sanding and buffing?
Flame polishing can create a glossy edge quickly, but it should not replace sanding if the edges have rough cuts or deep imperfections. Sanding is essential for smoothing the surface first; flame polishing is best as a finishing step.
3. Why does my acrylic edge look cloudy after sanding?
Cloudiness or a frosted appearance is normal after sanding. This happens because sanding creates micro-scratches. These scratches are removed in the buffing or flame polishing steps, restoring clarity.
4. What tools do I need to polish acrylic edges at home?
Basic tools include sandpaper (120 to 600 grit), a soft buffing wheel with acrylic polishing compound, water or lubricant for wet sanding, and optionally a hydrogen-oxygen torch for flame polishing. Safety gloves and goggles are also essential.
5. How do I prevent the acrylic from melting during polishing?
Avoid applying excessive pressure when buffing or using the flame. Keep movements steady and controlled, use proper lubrication while sanding, and never hold the acrylic too long in one spot—this helps prevent overheating and melting.
Related Articles